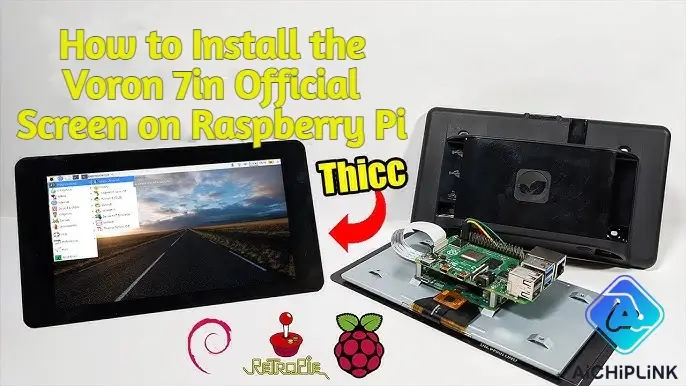
 Ready to set up your voron 7in official screen with raspberry pi? This guide helps you connect the display without confusion. You get zero driver hassles, so your voron 7-inch official screen works right away. The complete setup guide covers every step, making your voron screen easy to install on raspberry pi. You only need basic skills to follow this guide. If you run into problems, troubleshooting tips will help you fix your display and touch setup fast. Your voron and raspberry pi will work together perfectly.
Key Takeaways
-
Get all the hardware and tools you need first. You will need the Voron 7in screen, Raspberry Pi, FFC cable, jump wires, power supply, and a microSD card.
-
Connect the FFC cable with care. Make sure the blue side faces away. Use jump wires to connect power from the Raspberry Pi to the screen.
-
Put Raspberry Pi OS on the microSD card. Update the system. Add touch support so the screen and touchscreen work. You do not need extra drivers.
-
Install KlipperScreen and set it up. This lets you use the touchscreen to control your printer. Calibrate the touch input so it works right.
-
If you have problems, use the troubleshooting tips. Fix issues like no display, touch not working, or wrong resolution. Check your connections, calibrations, and settings.
Requirements
Hardware List
You need the right parts to get your voron 7in official screen working with your raspberry pi. Here’s what you should gather before you start the setup:
-
Voron 7in official screen – This display fits perfectly with voron printers and raspberry pi 4.
-
Raspberry pi board – You can use raspberry pi 4, raspberry pi 3, or raspberry pi Zero 2 W. Most people pick raspberry pi 4 for the best results.
-
FFC cable – This flat cable connects your screen to the raspberry pi. Make sure it matches the length you need for your printer.
-
Jump wires – These help you bridge power from the raspberry pi to the display.
-
Power supply – Your raspberry pi and screen need steady power. Use a reliable 5V power adapter.
-
MicroSD card – You need this to load the raspberry pi OS and run your display.
-
Case or mount – You want to keep your screen safe and steady on your voron printer.
Tip: Double-check that your FFC cable and jump wires match the connectors on your raspberry pi and display. This helps you avoid connection problems later.
Tools Needed
You don’t need fancy tools for this setup. Here’s a quick list:
-
Small Phillips screwdriver – You use this to secure the screen and raspberry pi.
-
Tweezers – These help you handle the FFC cable and jump wires.
-
Wire cutters or strippers – You might need these if your jump wires are too long.
-
MicroSD card reader – You use this to flash the raspberry pi OS onto your card.
You now have everything you need for a smooth raspberry pi and voron screen install. With these parts and tools, you can connect your display and get your voron printer ready for action.
Hardware Setup
Getting your voron 7in official screen working with raspberry pi is easier than you might think. You just need to follow a few simple steps. Let’s walk through the setup together so you can connect raspberry pi and enjoy your new display.
FFC Cable Connection
First, you need to connect the FFC cable. This cable links your screen to the raspberry pi. Here’s how you do it:
-
Find the FFC cable in your kit. Make sure it’s clean and not bent.
-
Look at the connectors on both the raspberry pi and the display. You’ll see a small latch on each connector.
-
Gently lift the latch on the raspberry pi. Slide one end of the FFC cable into the connector. The blue side of the cable should face away from the board.
-
Push the latch down to lock the cable in place.
-
Do the same thing on the display side. Make sure the cable sits straight and snug.
Tip: If you feel resistance, stop and check the cable orientation. Forcing the cable can damage the connectors.
You’ve finished the first step of your setup. The FFC cable is secure, and you’re ready to move on.
Power Wiring
Now, let’s get power to your screen. The voron 7in official screen needs steady power from the raspberry pi. Here’s what you do:
-
Grab your jump wires. These will bridge power from the raspberry pi to the display.
-
Find the 5V and GND pins on the raspberry pi GPIO header. You can use a pinout diagram if you’re not sure.
-
Connect one jump wire from the 5V pin on the raspberry pi to the 5V pin on the display.
-
Connect another jump wire from the GND pin on the raspberry pi to the GND pin on the display.
-
Double-check your connections. The wires should fit tight and not wiggle.
Note: Always power off your raspberry pi before you connect wires. This keeps your board and screen safe.
You’ve finished the power wiring. Your display will get the energy it needs for a bright and clear picture.
Mounting
The last step is mounting your screen. You want it to stay safe and steady on your voron printer. Here’s how you do it:
-
Pick a spot on your voron printer for the display. Most people choose the front panel for easy access.
-
Use the screws from your kit to attach the screen to the mount or case.
-
Tighten the screws with a small Phillips screwdriver. Don’t over-tighten, or you might crack the case.
-
Make sure the screen sits flat and doesn’t wobble.
-
Check that all cables and wires have enough room. You don’t want anything pinched or stretched.
Tip: If you use a custom mount, test the fit before you secure the screen. This helps you avoid mistakes.
You’ve finished the hardware setup. The voron 7in official screen is now connected to your raspberry pi and ready for action. The process is simple and reliable. You don’t need special skills or tools. Just follow these steps, and your display will work perfectly with your voron printer.
Software Setup
Getting your voron 7in official screen working with raspberry pi is easy when you follow the right steps. This part of the guide will help you set up the software so your screen lights up and responds to touch. You do not need to worry about extra drivers or tricky compatibility problems. The raspberry pi install process works smoothly with the official screen.
Raspberry Pi Install Steps
Let’s start with the basic setup for your raspberry pi and screen:
-
Flash Raspberry Pi OS onto your microSD card. Use the Raspberry Pi Imager tool for this step.
-
Insert the microSD card into your pi and power it up. Make sure your display is connected and powered before you boot the pi.
-
Open a terminal window on your raspberry pi.
-
Update your system by running:
sudo apt update && sudo apt upgrade -y -
Install touch support and calibration tools:
sudo apt install xserver-xorg-input-evdev xinput-calibrator -
Add your user to the input group:
sudo usermod -a -G input pi -
Reboot your pi to apply the changes.
Tip: Powering the display before you boot the pi helps the screen work right away.
Enable DSI
The voron 7in official screen uses the DSI interface. Most of the time, raspberry pi OS enables DSI by default. If you use a different OS, you might need to check the settings. Some users notice there is no DSI toggle in the latest raspberry pi configuration tool. If your screen does not turn on, double-check the ribbon cable and make sure the display gets power before the pi boots. If you see only HDMI output, try rebooting with the display powered first.
Config File Edit
You may need to tweak the configuration to get the best results. Open the /boot/config.txt file on your raspberry pi. Add these lines to set up the display:
dtoverlay=vc4-kms-dsi-7inch
display_auto_detect=0
disable_fw_kms_setup=1
max_framebuffers=2
If you want to rotate the screen, add:
display_rotate=2
Save the file and reboot your pi. Your screen should now show the raspberry pi desktop. You do not need extra drivers for the voron screen. The integration with raspberry pi OS is smooth and reliable.
Note: If you ever update your raspberry pi firmware and the display stops working, try rolling back to an earlier version. Sometimes updates can affect the touch controller.
KlipperScreen Guide
It is not hard to set up KlipperScreen on your voron 7in official screen. This guide shows you each step, from installing to fixing the touchscreen. You will get your touchscreen working well with your printer.
Install KlipperScreen
You need a working Raspberry Pi and the official screen connected. Here is how you install KlipperScreen:
-
Open a terminal on your Raspberry Pi.
-
Test your touchscreen to make sure it works on Raspberry Pi OS.
-
Download KlipperScreen by cloning the repository:
git clone https://github.com/KlipperScreen/KlipperScreen.git -
Go into the KlipperScreen folder:
cd KlipperScreen -
Run the install script:
./scripts/KlipperScreen-install.sh -
The script sets up everything you need, including extra programs and a service.
Tip: If you see errors, check your wires and try again. The official screen works well, so you should not have big problems.
Configuration
After installing KlipperScreen, you need to set up the configuration. This step helps your touchscreen talk to your printer. Open your moonraker.conf file and add your Raspberry Pi’s IP as a trusted client. You can also put your Moonraker API key in the KlipperScreen configuration file.
Now, update your printer.cfg file. Add these sections for better use:
-
[virtual_sdcard] -
[display_status] -
[pause_resume]
Some people make mistakes with klipperscreen configuration files. Always check that you use the right files and do not add files that are missing. If you get stuck, follow the official guide step by step.
Touch Calibration
Touch calibration makes sure your touchscreen works where you tap. If your touches do not match, you need to calibrate. Here is an easy way to do touchscreen calibration:
-
Find your touchscreen device name:
DISPLAY=:0 xinput -
Remove old calibration settings:
xinput set-prop "Device Name" "Coordinate Transformation Matrix" 1 0 0 0 1 0 0 0 1 -
Download and run a calibration tool like
xtcal. Follow the steps on the screen for touch calibration. -
Test the new calibration. If it works, save the settings in
/etc/udev/rules.d/51-touchscreen.rules. -
Restart your Pi to keep the calibration.
Note: If the calibration does not stay, you can change the Xorg configuration file and add the transformation matrix there.
With this guide, you can finish your touchscreen calibration and enjoy using KlipperScreen. If you have touch problems, check your calibration and configuration files first.
Troubleshooting
You might run into a few bumps when setting up your Voron 7in official screen. Don’t worry—most problems have quick fixes. This troubleshooting guide covers the most common failures and fixes, so you can get your display and touchscreen working fast.
No Display
If your display stays black after setup, try these steps:
-
Check the ribbon cable. Make sure it’s firmly connected and facing the right way. The clamp on both the Raspberry Pi and the screen must lock the cable in place.
-
Turn up the brightness on the TFT screen. Sometimes the display works, but it’s just too dim to see.
-
Double-check the display port connection between the screen and your Raspberry Pi.
-
SSH into your Raspberry Pi and uninstall KlipperScreen using kiauh. Reboot and watch for any console messages on the display during startup.
-
Open a terminal and run:
sudo raspi-configEnable I2C and SPI under Interface Options. Reboot your Pi.
-
Reinstall KlipperScreen with kiauh, then reboot again.
-
If you still see nothing, check for multiple framebuffer devices. Edit
/usr/share/X11/xorg.conf.d/99-fbturbo.confand make sure the correct framebuffer (like/dev/fb1) is set. -
Restart the KlipperScreen service after making changes.
-
If the problem continues, remove KlipperScreen completely and reinstall it from the official GitHub page.
-
Try different screen resolutions in raspi-config, such as 1920x1080.
If you’re troubleshooting black screens, always make sure the USB cable from the screen to the Raspberry Pi is connected. This helps the touchscreen work too.
Touch Issues
Sometimes the display works, but the touchscreen does not respond. Here’s what you can do:
-
Make sure the USB cable is plugged in between the screen and the Raspberry Pi. The touchscreen needs this connection.
-
Run a calibration tool like
xinput-calibratorto fix touch accuracy. If taps don’t match the screen, calibration will help. -
Remove old calibration settings before starting a new one. This keeps things clean.
-
Save your calibration settings so they stay after a reboot.
Tip: If the touchscreen still acts up, check your cables and try a different USB port.
Resolution Fix
A blurry or stretched display can make your setup hard to use. You can fix this by changing the resolution:
-
Open
raspi-configand go to Display Options. -
Pick a resolution that matches your screen, like 1920x1080.
-
Save and reboot your Pi.
-
If the display still looks wrong, check your
/boot/config.txtfor any custom settings that might affect the resolution.
Good calibration and the right resolution make your display and touchscreen feel smooth and accurate.
With these troubleshooting steps, you can solve most problems with your Voron 7in official screen. If you get stuck, double-check your connections and settings. Most issues come from small mistakes that are easy to fix.
You made it! Here’s a quick guide to keep your Voron 7in official screen and Raspberry Pi running smoothly:
-
Pick a Raspberry Pi 4 for best results and connect the DSI cable with care.
-
Mount the Pi and screen securely to avoid damage.
-
Power both with a strong 5V supply.
-
Enable DSI, check your config, and calibrate touch for a sharp display.
-
Set up KlipperScreen for easy printer control.
Always double-check your cables and settings. If you need help, join Raspberry Pi or Voron forums for advice.
FAQ
How do I know if my FFC cable is connected right?
Check the blue side of the cable. It should face away from the Raspberry Pi board. Make sure both latches click down. If your screen stays black, double-check the cable’s direction and connection.
Can I use a Raspberry Pi 3 or Zero 2 W?
Yes, you can! The screen works with Raspberry Pi 4, 3, and Zero 2 W. You might see faster performance with a Pi 4, but the others work fine for most setups.
What should I do if the touchscreen feels off?
Try running a touch calibration tool like
xinput-calibrator. Follow the on-screen steps. Save your settings so they stay after a reboot. If you still have trouble, check your USB cable and try a different port.
Do I need to install extra drivers for the Voron 7in screen?
Nope! The official screen works out of the box with Raspberry Pi OS. You just need to edit your config.txt file and reboot. No extra drivers or downloads needed.

Written by Jack Elliott from AIChipLink.
AIChipLink, one of the fastest-growing global independent electronic components distributors in the world, offers millions of products from thousands of manufacturers, and many of our in-stock parts is available to ship same day.
We mainly source and distribute integrated circuit (IC) products of brands such as Broadcom, Microchip, Texas Instruments, Infineon, NXP, Analog Devices, Qualcomm, Intel, etc., which are widely used in communication & network, telecom, industrial control, new energy and automotive electronics.
Empowered by AI, Linked to the Future. Get started on AIChipLink.com and submit your RFQ online today!


